MicroStation Cell Copy VBA
by Mark Stefanchuk, cadmanage.com
I’ve had several requests to update the cell copy MDL example I wrote for MicroStation SE. Thanks to Amos from Jacobs Engineering for the push earlier this year.
I had updated the MDL shortly after the first V8 release and it continued to work through V8 2004. More recent versions of MicroStation however, have introduced several changes that break this old command. Instead of just updating the MDL code, I decided to take a different approach.
The new version is written in VBA, which really simplifies the code and approach. Using the VBA IDE (integrated development environment), creating user forms (dialog boxes) is faster and easier than in MDL. And if you don’t know how to do something in VBA a quick web search will tell you how. So, for CAD managers who are pressed for time this is definitely the way to go.
The new program operates essentially like the old one. Load the source library into the left listbox. Load the destination library into the right listbox. Highlight the cells from the source library you want to add to the destination library and click the arrow button that points to the destination listbox. Click the Add button located at the bottom of the destination library listbox.
You can find a download link to the new version on our cadgurus page. The code is not locked – something I’m likely going to get grief for – “why are you giving away the store…” – “… because I like these cad manager types…”. And, as always these are examples that come with limited validation and error checking, so use at your own risk. Create backups of your libraries before modifying them with CellCopy, and be careful with the delete option. It will remove all cells from the library and you won’t be able to get them back if you haven’t first backed up the original.*
This is a MicroStation VBA. So you can load it using the “VBA Load (path + vba name)” key-in, for example “VBA LOAD C:\temp\cellcopy.mvba”. I usually use the VBA Project Manager so I can browse for the program and then set the Auto-Load option. (from the pull down menu, Utilities > Macro > Project Manager).
There are a couple of key coding points to make.
1) To copy the cells I use the information provided in the dialog box – the source and destination locations. The cell names are gathered by indexing the destination listbox and grabbing the highlighted cell names. If the cell name is already in the library then the program will skip it.
2) Delete Cells (advanced) – I didn’t find a method in VBA to delete the cells, but I did find one in the MDL reference. This MDL function requires that you pass a pointer for the cell name string. How do you do that?!
This MicroStation V8i Bentley Community page refers to the undocumented VBA function VarPtr. It says that you should use this to pass a pointer of your char* or void*. The MDL function I used was mdlCell_deleteInLibrary and the MDL Funtion Reference says to pass a type of MSWChar const*. So, when I used VarPtr, the function didn’t work – it returned a cell not found error. Ok.
The same VarPtr discussion on the Bentley Community says to look at http://msdn.microsoft.com/library for more information. Here you will find several other undocumented pointer functions including StrPtr. This one works. Yay. The indexing logic for delete is the same as it is for copy and deleting cells requires these four lines.
One more thing about the example – the Windows Open File Dialog (browse for cell library) helper code (unmodified) can be found on la-solutions web site. Bookmark this site, especially if you are developing programs for MicroStation – there are plenty of great programming examples here.
* If you want to share cell copy with others on your team, but you don’t want them to be able to delete cells then just hide the delete button. You can turn off it’s visible property and/or you can just set the enabled property to false.
About Mark Stefanchuk: Mark is a senior consultant with CAD Management Resources, Inc. He divides his time between developing innovative custom software solutions and helping clients navigate complex design automation environments. If you would like to find out how he can assist you with your design technology he can be reached by contacting us at info@cadmanage.com.
“I have text “points” that I need to add to a surface, how do I get them into a PNEZ format” (in MicroStation or AutoCAD)
by Seth Cohen, CADmanage.com
Lead Engineer A: “Hey Civil Designer A, I received this “point file” from Company XYZ, I think it has points in it, you can get a surface from it, right?
Civil Designer A: “Um, let me take a look at it, and I’ll let you know”
You open the file, and it turns out that the drawing file contains linework as well as text that happens to be at the correct XYZ, but these are definitely not points that you can use. Or can you? So, how do you export that text to a PNEZ file that you can then use to include in a surface? Let’s look at how you can do this in MicroStation or AutoCAD (without InRoads or Civil 3D).
MicroStation
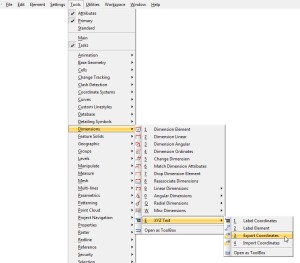
MicroStation contains a very nice set of tools in the XYZ Text category. However, before starting the tool, use element selection to select only the objects you need to create a PNEZ file. To access the XYZ Text tools, navigate to the menu bar Tools > Dimensions > XYZ Text, and select Export Coordinate tool (notice all the other cool tools in there as well). Just as a side note, this command is not limited to text; it will work with any object type’s vertices (e.g. lines, line strings, shapes, etc.).
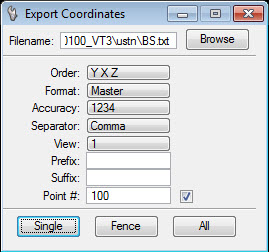
Then, in the Tool Settings window, set the appropriate settings (don’t forget NEZ = YXZ). Note that there is an option to define the starting point number if you need to create multiple point files, and you want to define a point offset for each. And that’s it.
AutoCAD
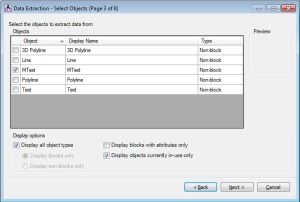
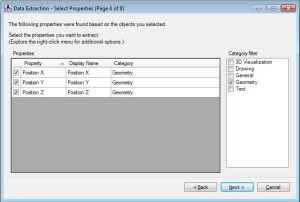
In AutoCAD, you can use the data extraction tools. Now, because you don’t have an option to pick a selection set with this tool, it would be best to WBLOCK out only the objects you want to extract into a separate .DWG file, so you don’t accidentally extract data you don’t need. Next, navigate to the Ribbon: Insert tab > Linking & Extraction panel > Extract Data tool. In the different parts of the data extraction wizard, you want to choose the object type you want, and only the property Positions Y, X, and Z.
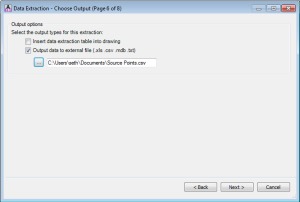
When you get to the Choose Output page, select the Output data to external file option, and choose the .CSV option.
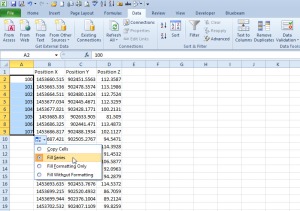
Now, open the .CSV file in Excel, and add a column for point numbers. Then, use the Excel auto fill option to automatically fill in point numbers.
So when the engineer hands you a file to make a surface out of, just say yes.
“Now you know, and knowing is half the battle.” …………G.I. Joe


